Opens the Sampling wizard panel to define the location of sample points, -lines or -polygons for a sampling procedure into an edited layer by using pre-defined sampling methods.
![]() The Sampling tool combined with the Navigate to Target function provides a convenient method to collect data at specified intervals on the field for observations. Such as soil samples, measuring the degree of weed infestation of a designated area, water depth, chemical concentration which required for contour map generation.
The Sampling tool combined with the Navigate to Target function provides a convenient method to collect data at specified intervals on the field for observations. Such as soil samples, measuring the degree of weed infestation of a designated area, water depth, chemical concentration which required for contour map generation.
The general steps of the Sampling wizard tool are:
1.Tap ![]() Sampling and the Sampling wizard dialog appears.
Sampling and the Sampling wizard dialog appears.
The Sampling wizard
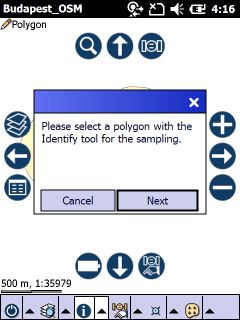
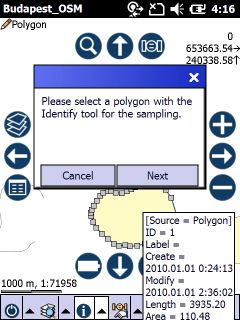
2.Select a polygon with the Identify tool on the map to designate the sampling area.
Selected polygon feature with the Identify tool
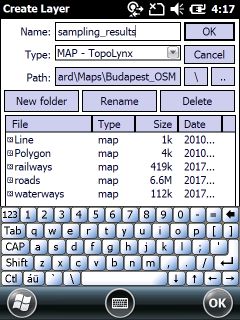
3.Create a new Layer on the Create Layer panel for storing the results in a vector layer.
Type the name of the new layer and select a file format you want to use. Select path
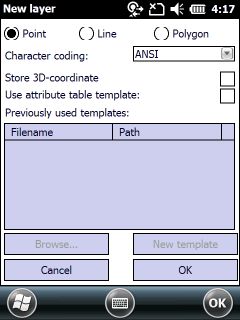
4.Select point, line or polygon feature type depending on the sampling method you want to use. Use an attribute table template if required on the New layer dialog.
Select attribute table template
5.Select a sampling method and enter its parameters on the Sampling panel.
The Sampling panel
6.Add the results into the created new layer by tapping the Create button.
Results of the sampling in a point layer

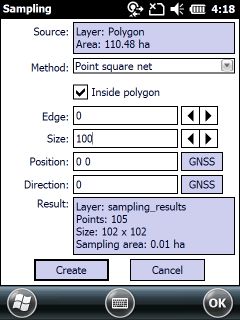
The Sampling panel
Source: displays the source layer's name and the area in hectare of the selected polygon feature.
Method: select a sampling method you wish to use.
1.Point square net: creates nodes of a square grid/rectangular grid into a point layer. If you want to create a square grid enter the length of the cell into the Size textbox. You can define a rectangular grid by entering the width and height of one cell as space separated values.
2.Point triangle net: creates nodes of a regular triangular grid into a point layer. If you want to create an equilateral triangular grid enter the size of the cell (all sides have the same length) into the Size textbox. You can define isosceles triangular grid by entering the length of the base and the height as space separated values.
3.Random point: create points within the area randomly into a point layer.
4.Polygon line net: creates parallel lines (rectangles) over the selected polygon into a polygon layer.
5.Polygon square net: same as Point square net; creates cells of a square grid/rectangular grid into a polygon layer.
6.Polygon triangle net: same as Point triangle net; creates cells of a equilateral/isosceles triangular grid into a polygon layer.
7.Polygon hexagon net: creates cells of a hexagonal grid into a polygon layer.
8.Line net: same as Point square net; creates lines of a square grid/rectangular grid into a line layer.
Inside polygon: create result points, lines, polygons within the polygon.
Edge: buffer on the boundary of the selected polygon.
Size: size of the grid cells in the current map unit. Space separated values are enabled.
Position: center of the grid with easting, northing coordinates. Default is 0,0.
Direction: direction of the grid. Default is 0, the north direction.
GPS button: takes over the current GPS coordinates to the position. Takes over the current GPS direction to the direction.
Result: displays the name of the edited layer (that will store the results of the selected sampling method), number of sampling points/areas, cell size and the sampling area size (area of one cell) in square meter.
Create: adds the results of the sampling into the edited layer.