Possible use cases
1.Connects the application to the GNSS receiver according to the Serial port, NTRIP, Antenna and Startup commands settings then opens the GNSS surveying panel to capture incoming GPS positions as point, line or polygon features into vector feature layers.
2.If there is no editable layer in the Layer Manager the New work layer dialog appears to select an existing or create a new vector feature layer before connecting to the GNSS receiver
Keyboard command: G
GNSS Surveying
1.![]() GPS satellite button: indicates the GPS port reading. Flashing when the GPS connection was success.
GPS satellite button: indicates the GPS port reading. Flashing when the GPS connection was success.
2.GNSS Survey panel: the description can be found below...
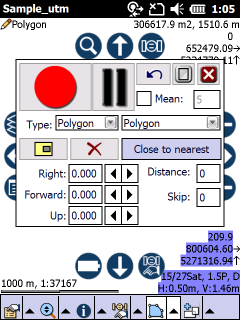
GNSS Surveying panel
GNSS Surveying panel
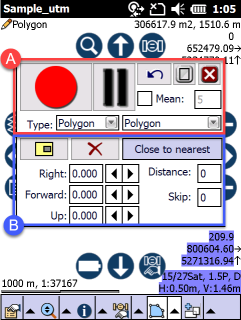
Appearance modes and controls of the panel
•![]() - minimizes the panel to Mode "A"
- minimizes the panel to Mode "A"
•![]() - maximizes the panel to Mode "B"
- maximizes the panel to Mode "B"
•![]() - closes the panel, but the started data capture(s) doesn't stop in the relevant layers
- closes the panel, but the started data capture(s) doesn't stop in the relevant layers
Displayed controls in Mode "A":
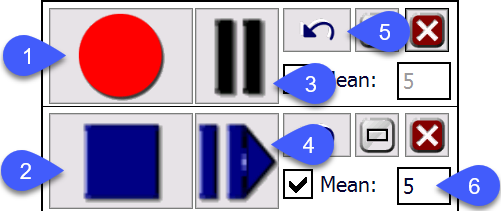
1.Record > Stop toggle button: starts data capture in the selected layer (see the layer list at the left hand side in figure - Mode "B")
2.Stop > Record toggle button: stops data capture and creates the geometry then proceeds to capture attributes according to the Settings > Record > New record: <selected option>
3.Pause > Continue toggle button: pauses data capture in the selected layer. Switches on automatically in averaging mode and when you start or stop surveying a subpolygon.
4.Continue > Pause toggle button: continues data capture in the selected layer
5.Undo last vertex: deletes the last captured vertex
6. [ ] Mean: Activates stop & go measurement mode when checked anyway the software captures continuously. Unchecked as default. Enables position averaging. Enter the number of positions to calculate the averaged Easting, Northing (Latitude, Longitude) coordinates.
The coordinate of the averaged GPS position calculated by the following formula:
Easting/Longitude coordinate= (X1 + X2 + X3 +...+ Xn)/n
Northing/Latitude coordinate= (Y1 + Y2 + Y3 +...+ Yn)/n
where n: meaning value
Displayed further controls in Mode "B":
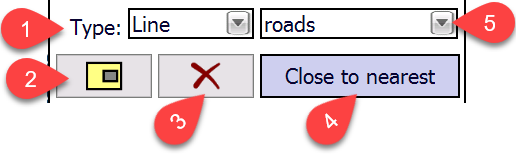
1.Type: displays the feature type/method that TopoLynx topoXplore can capture into the selected layer. If the selected layer is a multi-feature type layer = namely more than one feature type stored in the same layer, you can capture different feature types also as:
oN/A: means you have to select a feature type. Appears when working with DBF, TAB or TXT files.
oPoint: captures point feature type
oLine: captures line feature type
oPolygon: captures polygon/multipolygon feature type
oPoints: captures point features continuously. The attribute record of the new geometry appears to the first and then to every hundredth point features as default. The only exceptional case when the "No panel" option set under Settings > Record > New record.
![]() More than one feature types can be selected at the Type option above only for DGN, DXF and MIF file formats, in that special case when mixed feature types stored in the layer inherently. Otherwise it is not allowed in TopoLynx topoXplore to store more than one feature types in the same vector feature layer.
More than one feature types can be selected at the Type option above only for DGN, DXF and MIF file formats, in that special case when mixed feature types stored in the layer inherently. Otherwise it is not allowed in TopoLynx topoXplore to store more than one feature types in the same vector feature layer.
2.Start/Stop subpolygon toggle button:
o![]() Activate subpolygon survey: activates subpolygon survey, Pause toggle button switches into continue mode. The data capture of the subpolygon can be started by tapping / clicking on the Continue button.
Activate subpolygon survey: activates subpolygon survey, Pause toggle button switches into continue mode. The data capture of the subpolygon can be started by tapping / clicking on the Continue button.
o![]() Stop subpolygon survey: closes the data capture of the subpolygon, Pause toggle button switches into continue mode. The data capture of the 'main' polygon can be started by tapping / clicking on the Continue button.
Stop subpolygon survey: closes the data capture of the subpolygon, Pause toggle button switches into continue mode. The data capture of the 'main' polygon can be started by tapping / clicking on the Continue button.
3.Delete all vertices: deletes all captured vertices in the current data capture
4. Close to nearest - closes the polygon geometry in the current data capture to adjacent polygon features and creates a common boundary between them. The data capture process can only be closed when the nearest vertex will be within 5 meters to the adjacent polygon boundary.
5.Layer list: lists all editable = unlocked layers from the Layer Manager. Enables you to tap / click on the layer's name to select it for capturing data. GPS survey can be done simultaneously in the listed layers.
Displayed further controls: these options below related to the data capture process in the selected layer
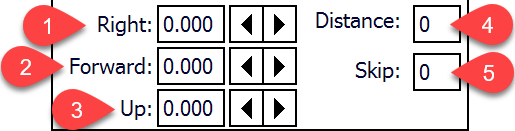
1.Right/Left: horizontally offsets continuously captured GPS positions to the right, in case of negative value offsets to the left
2.Forward/Back: horizontally offsets continuously captured GPS positions forward, in case of negative value backward
3.Up/Down: vertically offsets captured GPS positions upwards, in case of negative value downwards
4.Distance: enables you to control the data capture with a distance based filter. If the distance between the last captured position and the current position is less than this value TopoLynx topoXplore omits the incoming GPS position.
5.Skip: enables you to control the number of omitted positions between two captured positions