Opens the Survey panel. You can use five surveying methods with this tool. Designated base line (defined auxiliary coordinate system) is required for the first four methods. The Survey tool remains active for surveying until another tool is activated.
Tap / Left click: add start P1 and endpoint P2 (snapped) of the base line/auxiliary coordinate system on the map
Drag: drag the start P1 and endpoint P2 (snapped) of the base line/auxiliary coordinate system on the map
![]() You can fill the fields of the supported surveying methods with laser rangefinder/ecompas by measuring the proper distance/angle after you tapped on the field you wish to measure.
You can fill the fields of the supported surveying methods with laser rangefinder/ecompas by measuring the proper distance/angle after you tapped on the field you wish to measure.

Type: select the survey method you wish to use
The following surveying methods can be used on the Survey panel
1.Rectangular survey
2.Polar survey
3.Angle Intersection
4.Distance Intersection
5.Polar survey from start point
Z: height of the surveyed point/vertex position
Average - Averages the positions you have surveyed in the edited layer. In case of point feature type, last measured positions of existing point features will be replaced to an averaged point position; in case of working with a line/polygon feature type, last measured positions will be replaced to an averaged vertex position. (Measured positions are displayed on the map view as red vertices and/or auxiliary lines.)
P1=GPS - Takes over the current GPS position as the startpoint P1 of the baseline/auxiliary coordinate system
P2=GPS - Takes over the current GPS position as the endpoint P2 of the baseline/auxiliary coordinate system
![]() - Erases the last survey made to a feature
- Erases the last survey made to a feature
Add - Adds point, vertex or vertices into the edited layer based on the entered values of the current survey method. They are displayed on the map view as red vertex and/or auxiliary line. This button will create the point feature also. In case of using line or polygon features you need to tap and hold the stylus on the screen then select "Create" to store the feature in the edited vector layer.
Inst. height: Instance height. The default value is 1.45 m.
Sign. height: Signal height. The default value is 1.35 m.
The Survey panel with rectangular survey
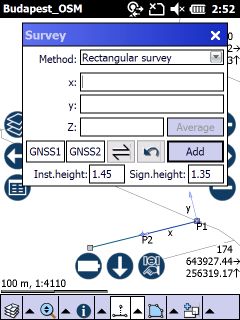
x: abscissa, the x coordinate
y: ordinate, the y coordinate
![]() "x", "y" values can be measured with the Set buttons on Topcon GMS-2PRO
"x", "y" values can be measured with the Set buttons on Topcon GMS-2PRO
The Survey panel with polar survey
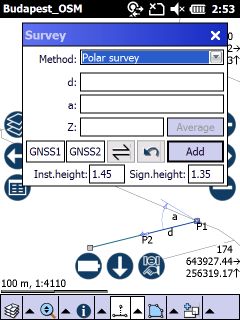
d: distance
a: angle
![]() "d", "a" values can be measured with the Set buttons on Topcon GMS-2PRO, "a" value can be measured with the Set button on Topcon GMS-2
"d", "a" values can be measured with the Set buttons on Topcon GMS-2PRO, "a" value can be measured with the Set button on Topcon GMS-2
The Survey panel with angle intersection
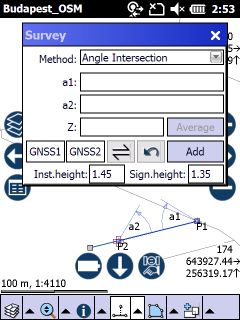
a1: measured angle from P1
a2: measured angle from P2
![]() "a1", "a2" values can be measured with the Set buttons on Topcon GMS-2 and Topcon GMS-2PRO
"a1", "a2" values can be measured with the Set buttons on Topcon GMS-2 and Topcon GMS-2PRO
The Survey panel with distance intersection

d1: measured distance (radius) from P1
d2: measured distance (radius) from P2
![]() "d1", "d2" values can be measured with the Set buttons on Topcon GMS-2PRO
"d1", "d2" values can be measured with the Set buttons on Topcon GMS-2PRO
5. Polar survey from start point
The Survey panel with polar survey from start point method
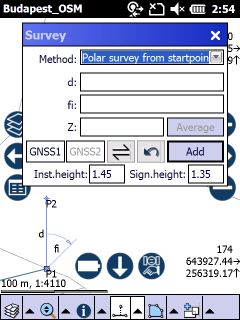
d: distance
fi: polar angle, azimuth
![]() "d", "fi" values can be measured with the Set buttons on Topcon GMS-2PRO, "fi" value can be measured with the Set button on Topcon GMS-2
"d", "fi" values can be measured with the Set buttons on Topcon GMS-2PRO, "fi" value can be measured with the Set button on Topcon GMS-2
![]() TopoLynx topoXplore calculates in decimal degrees (not in radian). The zero value is equal with the direction of the North. You have to enter every angle in decimal mode not in DD-MM-SS format. Negative decimal degrees can be used.
TopoLynx topoXplore calculates in decimal degrees (not in radian). The zero value is equal with the direction of the North. You have to enter every angle in decimal mode not in DD-MM-SS format. Negative decimal degrees can be used.
![]() All data fields can be filled by measuring with a TruPulse 360B laser rangefinder. With Polar survey from startpoint you can easily record points in the field with a TruPulse.
All data fields can be filled by measuring with a TruPulse 360B laser rangefinder. With Polar survey from startpoint you can easily record points in the field with a TruPulse.
0˚ = North
90˚ = East
180˚ = South
270˚ = West